Layouts that are easy to make, fun to use!
The layouts illustrated here are intended for use with O scale hi-rail train running. They can be set up in under an hour. Each layout has a simple train operation to make it interesting. Note that they are all based on real railroads. Sure, we've made a few changes to make them more fun, but the underlying principle comes from rail lines we have travelled ourselves.
None of these layouts are drawn to scale. They are a guideline. Adapt them to fit your space and your ideas. The layouts are offered as the foundation of good, interesting model railroad operations. You can adapt as you wish.
Speed Up Your Start Up
To speed up start-up time, it helps if you store track partially assembled. That includes wiring to switches and accessories. The idea is to set up quickly, so use lockons and other connectors with an eye to getting the layout together and turning on the juice as efficient as possible.
Layout #1 - Interurban - Commuter "Staten Island RR"
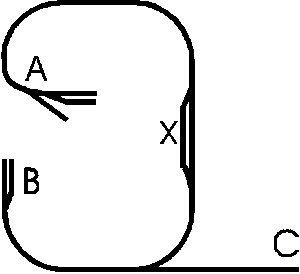
Based on the very line running past our home, this is the basic point-to-point operation with a few interesting twists. There are 4 blocks: Point A to the upper switch of the passing siding, Point B to the upper switch, the passing siding itself, and Point B to Point C. For the yards, you need an "on-off" switch for each siding.

You need a minimum of two commuter trains (use interurbans, trolleys, doodlebugs, etc) and one Maintenance of Way Train (loco, hopper, flat).
Operations begin at Point A. One commuter train is rushed to Point B. From there, trains start toward each other. The Southbound (A to B) enters the siding while Northbound (B to A) uses the main line. A slim passenger station can be placed inside the siding.
When the Southbound reaches B, it must them service C. That is a straight run out to C and back to B. Once back,. it proceeds Northbound. Simultaneously, the train at A starts heading South.
You can vary this by having the Southbound start simultaneously with the Northbound making the service run to C.
Of course, stations will be placed along the way with regular stops.
For added interest, have the MOW train come out occasionally for repairs or ongoing construction. Now you have 3 trains to handle.
If you want, use the third commuter train to handle the B to C service. that's 3 trains plus one MOW drill.
Image is not drawn to scale! Adjust as you see fit. You can set this up in a living room and run it all day. Setup time - about 15 to 30 minutes.
Requirements: 2 or 3 commuter trains (trolley, scoot, interurban, doodlebug)
1 MOW (loco, hopper, flat)
3 pairs of switches
Layout #2 Erie Lackawanna Line
This is based loosely on the runs from Hoboken to Northern New Jersey, and takes somewhat from the Long Island railroad's Southern and Northern spurs. It begins as a two-line operation that can handle two to four trains easily. The foundation is the previous commuter line with an additional line. We keep the original two-train operation and add a wider one running from A to C. Both lines run spur service to D.
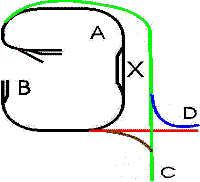
For added interest, a connecting link with one or two pairs of switches can be added at point X to connect the Black line with the Green.
Green line can handle two trains easily. A third train dedicated strictly to serve Point D would add to the fun, as you try to juggle Northbound and Southbound service between A - C and A- D.
You can add B to C service with two switches. Of course, the original two-train operation on the Black Line makes this busy. The additional work caused by the MOW train can require switching Black line trains to detour along the Green line, and vice versa. You will be busy if you run more than four trains on this two-line layout!
This layout can be set up in about half an hour.
11 switches (5 pairs, 1 single)
1 90% crossover
2 to 6 commuter trains
MOW with loco, hopper, flat
Layout #3 The Big Commuter
Here's where we expand on both the aforementioned layouts. You will need more than one person to handle this layout! What we've done is reversed the original layout and added it to the second one, allowing for a small trolley operation within a larger commuter/passenger layout. Note that this plan is not drawn to scale and can be adjusted to suit your whims.
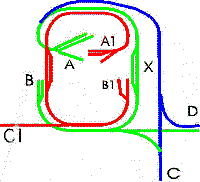
The Red line is the in-town commuter service, Green is a larger line serving both town and outlying districts, and Blue serves out-of-town points only.
If you're into scheduling, you have to plan for the Red line's stops to allow for transfer to and from the Green line. This is especially important for the trains serving C1. You also have to plan connections between Green and Blue line trains. If you're running trolleys or other electrics, consider the Blue line and part of the Green to have no electrification.
Let's see. that's two or three trains on the Red, two or three on the Green, and two or three on the Blue. One MOW train handles the Green and Blue, and a separate one handles the Red. The Red's train will be a small diesel switcher (in case electrified power goes out) and a tool car (for electrical tools). A second switcher would be helpful if, in your operations, you allow for electrification to go out.
Setup time - 30 to 45 minutes
9 pairs of switches
Two 90% crossovers
2 or 3 short commuters (trolley, interurban, doodlebug)
1 to 3 mid-range commuters (doodlebugs, interurbans)
1 to 3 Blue line commuters (small passenger train)
Red line MOW (loco, tool car)
Blue/green MOW (loco, flat, hopper)
Layout #4 - The Hoboken Shuttle
This one is based on the old Hoboken Shore Railroad, which served the piers along River Street. We added to it. There are three "main" lines served, along with freight interchanges to the New York Central in the North and Lackawanna at the south end of town. The New York Central is freight-only. while the Lackawanna handles mainline and local passenger trains, mainline freight, and car floats and ferry service to Manhattan.
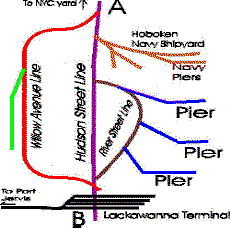
The Brown Line is a drill serving several piers (we show three, you can have more) and one shipyard (you can add more). Its role is to bring supplies of coal and freight to ships on all piers. On Blue piers, it brings back cargo for transfer to NYC or Lackawanna. On Navy Yard piers, no cargo is picked up. (You may want to have a commuter serve the Navy Yard workers, however).
Coal, iron and milk come via the Lackawanna. The NYC brings transformers and other machinery for ships. Both bring general freight. Empty hoppers and milk reefers must be returned to the lackawanna yard.
Industrial spurs can be found along the Red Line (we show one, you can have more). Among industries there is the Propeller Plant. You will drop raw metals at the plant, and pick up propellers for delivery to the Shipyards.
A second shipyard can be added. That is the barge repair yard, and it is just south of the Navy Yard.
Although the Hoboken Shore never ran commuter trains, we added that touch with a run from A to B and another from A to C. A third River Street run would serve workers twice a day. Note that River Street is curvy, and would best be done in 027 track. Some trains cannot use that line. Hudson Street is residential from the River Street switch to the Lackawanna Terminal. Freights will only use it when River Street is blocked or impassable due to tight curves. The Red line also uses 027 curves, but these are stretched enough to allow slow-moving freights. You have to coordinate freight and commuters, with consideration for matching the schedule of ferries and regular passenger trains from the Lackawanna Terminal.
Note that the Purple Line cuts through the Lackawanna passenger yard to get to the freight interchange and car floats.
This layout can be connected with a larger freight operation based on the Lackawanna and NYC.
You need:
6 to 8 pairs of switches
1 90% crossover per Lackawanna track
2 to 4 in-city commuters (trolleys, etc)
River street switcher
Navy yard switcher
Large switcher to handle Willow Ave and Hudson Street
Hoppers, flats, reefers and tank cars for serving ships
Gondolas for hailing iron to Navy yard and Propeller plant
Flat car for propellers going to Navy Yard.
Layout #5 - The Jersey Shore
Based on the old CNJ line to Bayhead, NJ, with added input from the Navy Ammunition Depot and the freight mainline. This is a complex little monster entailing the regular commuters and Shore drill on the green line. Interference comes from the Navy ammo trains heading to the piers in Raritan bay, and rerouting of freights onto the Green Line from the Red. The local drill serving a handful of industrial spurs along the Green also hampers passenger operations. The bridges (1,2,3) are all drawbridges, which can make for more trouble.
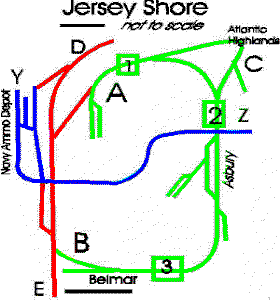
The normal freight run from North Jersey enters the layout at D and heads past E to South Jersey, Pennsy, etc. It has two connections with the Navy's Blue Line. Note that freight can leave cargo on the red spurs connecting to the Blue, but may not even enter the Blue Line itself. The Ammo Depot is a secure facility. A Navy switcher takes freight into the Blue Line and also runs it to the Raritan at Z. Passenger trains operating on the Green Line cannot be near the Navy ammo train. They must wait on the North side of Bridge 2 or south of the Asbury Siding until the ammo train finishes crossing the line.
For our purposes, Belmar at B is the end of the Green Line. Trains run from A to B, B to A most of the time. Every so often, the train will take the wide route via C, bypassing stations between 1 and 2. You might have an additional, regular shuttle from A to C.
The drill drops off freight at sidings along the main. Be award that its work will occasionally block the Green mainline. Also, freights normally using the Red line will occasionally be rerouted along the Green.
On rare occasions when the Blue line is blocked, the Navy ammo train will enter onto the Green line. Passenger trains can never be closer than one station from a loaded ammo train! The Navy train will normally use the spur at C if its own pier is blocked.
Sure, there's lots of action here. It takes about 45 minutes to an hour to set this layout up. You need at least two passenger trains (Northbound and Southbound), one Green line drill (switcher with several boxcars and hoppers, etc.), the Navy train (switcher with five or six freight cars), MOW (small engine with hopper, flat, tool car or crane), and Red Line freights (BIG diesels, lots of cars).
You can vary this a lot. Here are some examples:
Add a switcher operation breaking up Red Line freights for delivery to Green Line and Navy sidings.
Use operating accessories, such as barrel loader, etc, in Navy's yard
Delete the Red line and run it strictly as a passenger operations.
Expand the industrial operations along the Green.
Change the Navy Blue line to a separate commuter line linking with a ferry at Z; it would connect with Green Line trains at a station near 2.
Schedule two trains daily to Belmar to coincide with sports fishing boats' departure and arrival times.
You need:
8 pairs of switches
3 90% crossings (1 inside navy yard, 1 each where Blue crosses Green and Red)
2 to 4 passenger trains
1 switcher for drill (plus freight cars for sidings)
1 mainline freight loco with train
1 switcher for Navy, plus 4 or more ammo cars
3 bridges
Layout #6 - Industrial Terminal
This layout has lots of switching. It is based on the small industrial areas that were found in Jersey City, Bayonne, Secaucus and the Hudson River waterfront. Industrial railroading is a place where operating accessories can strut their stuff. Barrel loaders and similar fare are right at home here. You can include trucking, piggyback loads, intermodals and everything from tank farms to grain elevators. After all, the goal is fun running.
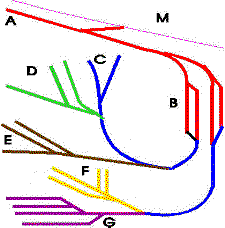
A freight comes in along Track M. It uncouples its load outside the switch. The locomotives proceeds past the switch. A switcher at A comes out and breaks down the train, carefully placing cars in the classification yard at B. Usually, this switcher's operating area is the Red line. It may also operate along the Blue Line, which is railroad property past the classification sidings. D, E, F and G are the property of four different industries. Each has its own switcher, which may operate in its own territory and on the Blue Line.
C is a separate railroad spur, used for a second switcher, MOW or sanding/fuel rack.
In the basic operation, the Red line switcher breaks up the freight and leaves various cars in specific sidings in the classification yard. Industrial switchers then come, take the cars to their yards, and replace them with other cars ready to ship out. You might prefer to have a Blue line switcher deliver and receive cars from each industrial yard. A train is made up in the classification yard by the industries or the Blue line switcher.
Meanwhile, on the red line, the freight has been broken up, leaving a caboose just outside the switch. The Red line switcher takes the caboose into the A siding. The freight locomotive moves forward well past the switch. The Red line switcher brings the caboose out and couples it to the locomotive. We have managed to move the caboose to the freight loco's opposite end.
When it is time to make the freight, the train is put together by the Red line switcher. The locomotive leaves the caboose in the purple siding. The loco moves forward well past the switch, allowing the switcher to couple cars behind it. Once the train is assembled, the locomotive moves back, couples the caboose, and is on its way.
You need:
10 to 12 pairs of switches
One freight locomotive
An entire freight trains
Red line switcher
(Additional blue line switcher is optional)
4 industrial switchers
Operating accessories (barrel loaders,cranes, etc)
Plenty of freight cars, including operating cars.
Set up time on this layout runs from 40 minutes to a little over an hour.
Click here for more Train Runner Layouts