We present for you more of our Train Runner layouts, offering an easy-to-make track plan with a challenging operation built into it. They are not drawn to scale ,so adapt freely to fit your space and your ideas. The fun is in the running, and this next batch will keep a few individuals busy.
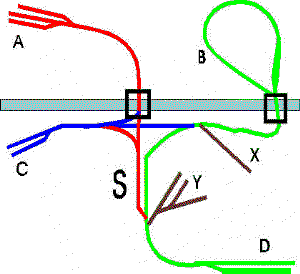
Layout #7 - Cross-Hudson Commuter
This layout is based on the PATH trains linking Newark, Jersey City and Hoboken in New Jersey with Manhattan. There are two lines on each side of the river in the prototype. On the Manhattan side, there's New Jersey to 33rd Street at 6th Avenue (Herald Square), and New Jersey to the World Trade Center (Downtown "Wall Street" financial district). On the Jersey side, there's New York to Hoboken and New York to Newark via Journal Square (Jersey City). In the real PATH, all of these are two-track lines. Only the portion from Journal Square to Newark runs above ground. The switches used in the tunnels are specially engineered and imported from Britain.
Our version makes it simple. The Red line runs from S - Journal Square - to 33rd Street. The Green line runs from D - Newark - to the B - World Trade Center. The Blue line runs from C - Hoboken, connecting either to the Green into the Trade Center or the Red to 33rd Street. Y is the MOW yard, and X is the car shop. One track at 33rd street is used for car cleaning at any given time, and is not open to passengers. Between the River and 33rd Street terminal are four stations on the Red line. There's one station between S and D and two stations between S and the River on the Green line. The Blue line connects Green between two stations. There's also a station where Red intersects Blue.
There are always two trains on the Red line, at least one on the Blue, and two or three on the Green. These are the regular routes which must be maintained:
S to A, A to S
A to C, C to A
C to B, B to A
B to D, D to B
Passengers for C from S must change trains at the intersection; passengers from A to any point between S and B on the Green must change at the intersection, S, or C.
On weekend, holidays, and during breakdowns on the Red or Blue lines, trains run from S to C and then to A, and vice versa. These may not interrupt regular operations along the Green line. The Green line must be open at all times and must operate on or close to schedule!
From S to D, you can double-track the Green line if you wish. That can be even more fun....
Connections to other rail links are at:
C - Lackawanna Terminal - mainline passenger service North and West
D - Pennsylvania Station Newark - mainline passenger service South and Southwest
A - Long Island Railroad - passenger service East
A - Pennsylvania Station - passenger service West to Newark and then South and Southwest.
In our layout, which is of necessity an above-ground operation, two bridges handle river crossing. The entire line is electrified. MOW can be an electrified train here.
The Cross hudson can be one rough little operation!
You need: 8 pairs of switches
1 90% crossover
8 commuter trains
1 or 2 MOW train (MOW consists of flat car, tool car, one old passenger car)
Layout #8 - The Tottenville Terminal
This is a two-track operation based on Staten Island's commuter line along the South Shore. It looks easy, but note that there are NO passing sidings. Stations are at both terminals - St. George - A - and Tottenville - B - plus several along the line itself. Each crossover is a single pair of switches, so if you must move to another track, one train will have to reverse itself onto the other line. point C is the engine/car shop, from which MOW operates.
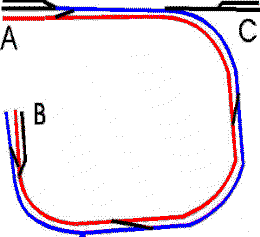
In normal operations, trains from A to B use the Blue line, and those from B to A, the Red. B to A usually takes preference because it must connect with the Ferry at A. The only interchanges are with bus lines. As the buses run often, there's no schedule to meet other than making it in time for passengers to catch the Ferry.
Two trains operate normally, with ongoing MOW being performed along the line. Trains must manage to bypass MOW on the other line, and that's where things get dicey. You have to get the A - bound train moving first whenever you are shuffling trains on a single track.
There's another glitch - the express during Rush hour. Along with the two normal trains, two express trains operate between A and a station directly between A and B. This is an express from A to the station, and then it continues from there as another local. On the way back, it is an express from B to the midpoint station, and then functions as an extra local from there to A.
The line is electrified, but MOW is diesel-powered
You need:
6 pairs of switches
3 or more commuter trains
One MOW (switcher, flat car, caboose or tool car)
This layout is designed as an interesting switching operation. It is not based on any particular prototype, though some of its elements have their basis in real railroads. If you like point-to-point switching operations, you'll find some real challenges here. The Switchman's Cross is adaptable to all kinds of railroad operations. With a little adaptation here and there, it can become an unusual commuter or passenger line, a special freight road or a combination of activities.
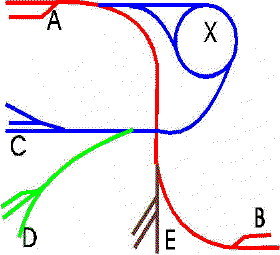
The Switchman's Cross, as a switching operation, has two main lines. The Red line is a simple point-to-point short line running from A to B, with service to an industrial yard at E. The Blue Line is more detailed, having point-to-point from A to C, a spur at D, and a reversing loop at X. Both lines originate at A. The Blue crosses the Red Line midway between A and B. You may use either a 90% crossover or an overpass. Any transfer of trains between Red and Blue must occur at A. Looks simple? Hmmmm.
The reversing loop makes this layout good for both steam and diesel operations.
You can extend the Red Line into a regular mainline passenger, freight or combined route. This makes for a nice blend of localized switching and point-to-point mainline service. The Switchman's Cross can also be a connecting road between larger railroads. A, B and C easily become major transfer points.
You need:
7 pairs of switches
1 90% crossover or a trestle
2 to 5 locomotives
All the freight you can fit!
Layout #10 "Two to One"
If you don't have many switches, this layout offers a few challenges. It employs the same commuter trains and MOW as Layout#1. The difference is that half of the layout is really a large loop, serving as a "poor man's double track." This loop reverses the train as well as replaces a passing siding.
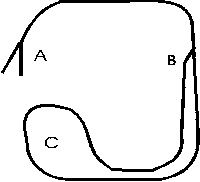
A can either be a simp-le end platform and spur siding, or can be a smaller reversing loop. Loops are great for steam operations or any circumstance where a train must turn around before retracing its steps.
 Click
here to return to the Station
Click
here to return to the Station